Smoke First, Sear Last: The Case for the Reverse Sear on a Smoker
Forget the oven. The reverse sear belongs on a smoker — here's why the smoke phase transforms a great steak into something genuinely remarkable.
A gentleman knows the difference between a technique and a trick. Tricks are clever. Techniques are earned.
The reverse sear is a technique — and when you move it from the oven to the smoker, it transforms from clever to transcendent.
What the Oven Crowd Gets Wrong
The standard reverse sear guides will tell you to set your oven to 225°F, roast your steak low and slow, then blast it in a cast iron to finish. Sound advice. Reliably excellent results.
But here’s what they never tell you: the oven does nothing for flavour. It manages temperature. That’s it. Your steak comes out perfectly cooked, evenly pink edge to edge — and tasting exactly like a steak that sat in a warm box for an hour.
The smoker changes the equation entirely.
The Science Behind the Smoke Phase
When you run the low phase of a reverse sear on a smoker, you’re doing two things simultaneously: managing internal temperature and building a smoke ring.
The smoke ring — that rosy layer just beneath the crust — isn’t just aesthetic. It’s the result of nitrogen dioxide from combustion bonding with the myoglobin in the meat while it’s still below 140°F. Past that temperature threshold, the reaction stops. The oven gives you no nitrogen dioxide. The smoker gives you plenty.
A 45-to-90-minute smoke phase on a properly managed fire at 225–250°F will:
- Drive the internal temp to 115–120°F (the target for a medium-rare pull)
- Build a smoke ring 3–6mm deep
- Lay a dry pellicle on the surface that sears ferociously when it hits cast iron
That last point matters more than most people realise.
The Setup
The cut. The reverse sear rewards thickness. You want at least 1.5 inches — ideally closer to 2. A bone-in ribeye or thick-cut striploin are the gentlemen’s choices. Anything thinner and you’re fighting the clock.
The dry brine. Season generously with coarse kosher salt 12–24 hours ahead. Leave uncovered in the refrigerator. The surface will dry out considerably — this is exactly what you want. That dry exterior becomes your crust.
The wood. For beef, restraint wins. Cherry or post oak. A small split or two is enough for a 90-minute smoke phase. You’re adding a whisper, not a shout. Over-smoking a steak is a genuine tragedy.
The smoker temperature. Stabilise at 225–250°F before the steak goes on. You’re not cooking the outside — you’re warming the interior and building character.
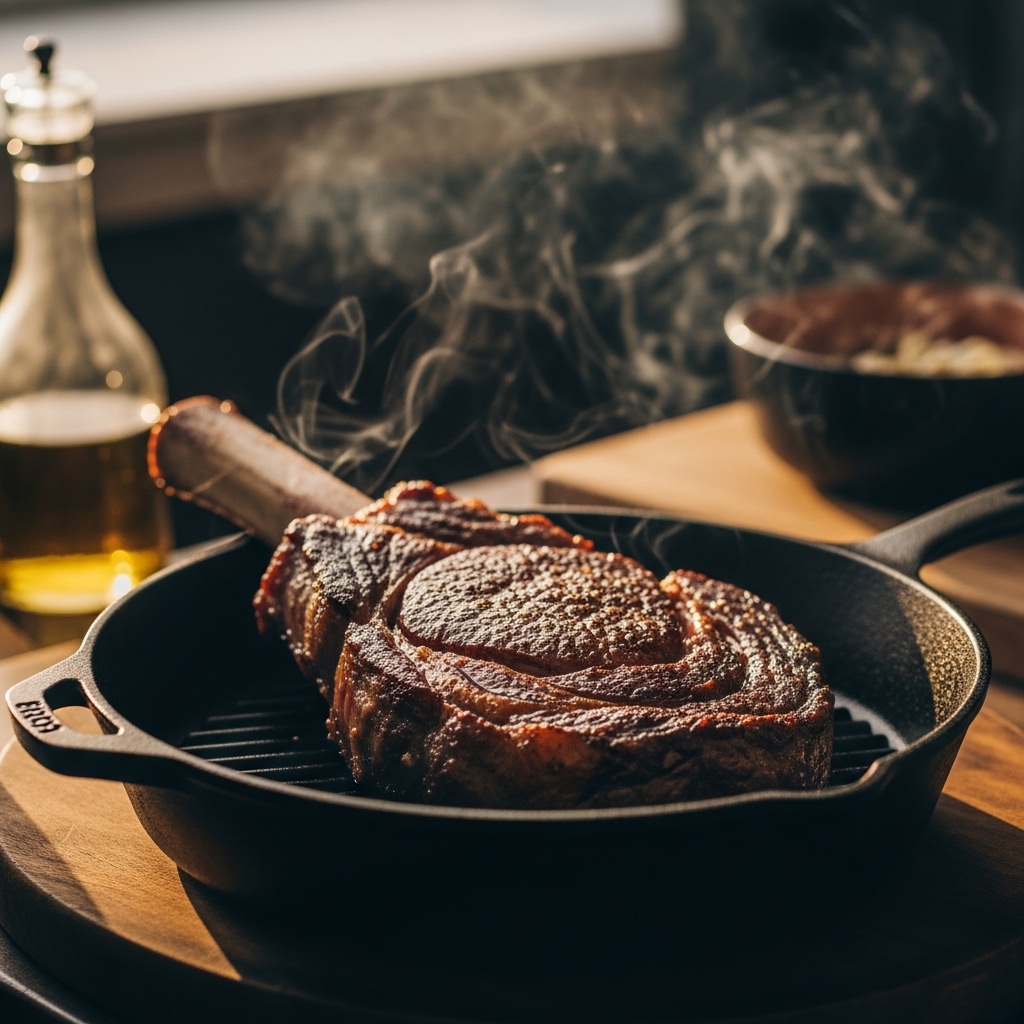
The Execution
1. Smoke phase — 225°F until internal temp hits 115–120°F. For a 2-inch ribeye, budget 45–90 minutes. Use a probe thermometer. Pull the steak and let it rest uncovered on a wire rack for 10 minutes while you get your cast iron ripping hot.
2. The sear — cast iron, 2 minutes per side. The surface of the steak should be dry and almost tacky after its rest. That texture creates a crust that a wet-surface steak simply cannot achieve. Cast iron, a tablespoon of high-smoke-point oil, and no fussing. Flip once. Add butter and thyme in the final 30 seconds if you’re feeling generous.
3. Rest — 5 minutes, then serve. A short rest is sufficient. The low-and-slow phase means the juices are already reasonably distributed.
The Result
Edge-to-edge pink. A crust that shatters. And beneath it — a smoke ring that tells a story your fork never could.
This is the version you serve when someone tells you they know what a good steak tastes like.
Want to dial in your tools before attempting this? The Essential Tools of a Gentleman Pitmaster covers the cast iron, thermometer, and splitter worth investing in. And if you’re new to managing fire, The Art of Patience is where the education begins.